Types of templates
In the top bar of your screen there are tabs there to toggle between different template types.

Brand Templates: These are core to your brand and are commonly used by your users. Most of your templates will be found here because you can fully customize the category bar on the left.
Personal Templates: Any templates you create will be found here.
Shared Templates: If someone shared a template with you, you can find them in this section.
Marq Templates: All Marq templates are located here.
Create a custom template
Step 1: Create a new project.
Make it snazzy! Put images and text as placeholders where needed.
Step 2: Add smart fields
If you want your project to auto-populate with information, add smart fields to your text. See our “Smart Fields” article to learn more.
Step 3: Add locking
Marq has various types of locking you can apply to objects to keep your brand consistent. The Team and Business subscriptions allow you to utilize the full capability of locking. Our other subscriptions allow you to fully lock objects.
To learn more about locking, visit our “Locking” article.
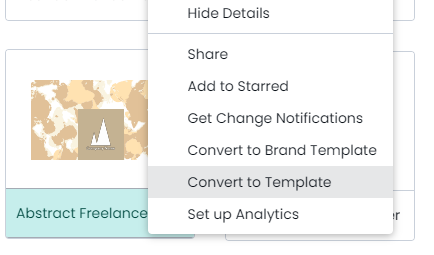
Step 4: Convert to a template
Locate your project. Click "More", then "Convert to Brand Template" (if you want it to be in the template section) or "Convert to Template" (if you want it to be a personal template on your "My projects" page).
Edit your templates
If you need to make edits to your template, hover over the template and click “More”. Then, click “Edit Template” or "Edit Brand Template". Remember: if a user made a project from the template, any future changes you make to the template will NOT be applied to the older projects. Only future projects created from the template will include the new changes.